


Drywall is the foundation of most interior walls in residential and commercial spaces. While it provides a smooth and even surface, achieving a flawless finish during painting requires more than just rolling on a coat of color. Without the right preparation and technique, imperfections can become painfully visible, especially under certain lighting conditions.
Drywall painting may seem straightforward, but it’s an art that requires precision, patience, and proper materials. Whether you’re tackling a new drywall installation or repainting existing surfaces, the end result depends heavily on the preparation work and painting technique you use.
Even professional painters recognize that quality drywall work makes or breaks the final appearance of a painted room. That’s why experienced contractors like Wise Properties Painting & Pressure Washing emphasize thorough prep and expert methods for every drywall job. Whether you’re a DIY enthusiast or hiring a professional, mastering these tips will help you achieve the smooth, professional look you’re aiming for.
Understanding the Importance of Proper Drywall Prep
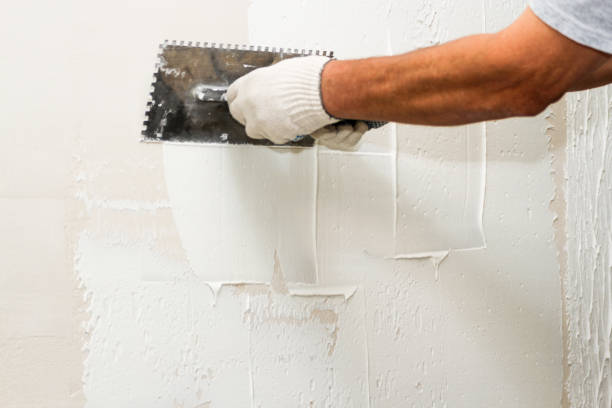
One of the most overlooked yet crucial aspects of drywall painting is preparation. Unlike other wall surfaces, drywall requires careful attention to seams, screw holes, and surface texture. If not addressed properly, these minor imperfections will be magnified after paint is applied—especially with flat or matte finishes.
Start by inspecting the surface for any irregularities. Joints should be fully covered with joint compound (also called mud), and all screw heads should be filled and sanded flat. Use a work light at an angle to reveal surface flaws that might not be visible under normal lighting.
After sanding, wipe down the entire wall to remove fine dust. This dust can prevent paint from adhering properly and leave a gritty texture behind. A tack cloth or damp microfiber cloth works best for this task.
Prime Before You Paint
Priming new or repaired drywall is an essential step that should never be skipped. Primer helps to seal the porous surface of drywall and joint compound, creating a uniform base that allows the paint to bond evenly.
Using a high-quality drywall primer ensures better color coverage and a consistent sheen in the final coat. Skipping primer can result in blotchy patches, inconsistent color, and even peeling over time.
If your walls have been previously painted and you’re not covering dark colors or stains, a primer may not always be necessary. However, in cases of water damage, new installations, or patched sections, priming is a must.
Choosing the Right Tools and Paint
For a professional-looking finish, invest in high-quality brushes and rollers. A ⅜-inch nap roller is ideal for smooth drywall surfaces. Use synthetic brushes for water-based paints, which are most commonly used in interior applications.
The type of paint finish you choose also affects the final look and maintenance of the wall. Here’s a quick breakdown:
- Flat or matte: Great for hiding imperfections, but less washable
- Eggshell: Offers a soft finish with some stain resistance
- Satin: More durable and easy to clean; ideal for high-traffic areas
- Semi-gloss and gloss: Reflective and very washable, often used for trim or bathrooms
For most interior drywall painting projects, eggshell or satin finishes strike the best balance between appearance and durability.
Mastering the Cutting-In Technique
Cutting in is the process of painting corners and edges with a brush before rolling the main wall. This step allows for a cleaner transition between surfaces like ceilings, baseboards, and trim.
Use an angled sash brush and take your time. Work with a steady hand, and don’t overload the brush with paint. To blend your cutting-in work with the rolled surface, try to paint a few inches beyond the corner and feather the edge.
Consistency in paint thickness and timing will also help avoid “framing,” a common problem where brush-painted areas dry before rolling and appear darker or glossier.
Using the Roll-and-Tip Method
For large areas of drywall, rolling is the most efficient way to apply paint. To achieve a smooth, even coat, roll in a “W” or “M” pattern and fill in the space without lifting the roller.
Apply light pressure and work in 3’x3’ sections to maintain a wet edge and prevent overlap marks. After rolling a section, go back over it lightly in one direction to level the texture.
If you’re using a sheen like satin or semi-gloss, consider the roll-and-tip method—rolling the paint and then lightly dragging a clean, dry roller or brush over the surface to remove any bubbles and even out the finish.
Managing Paint Drying Times and Second Coats
Allow adequate drying time between coats—typically 2 to 4 hours, depending on the type of paint and room conditions. Rushing this process can result in streaks, peeling, or poor adhesion.
For the best finish, always apply two coats of paint. The first coat provides coverage and adhesion, while the second creates a consistent sheen and enhances color depth.
Allow the final coat to cure fully before moving furniture back into the room or hanging wall decorations. This can take up to two weeks, even if the paint feels dry to the touch.
Common Drywall Painting Mistakes to Avoid
- Skipping primer
- Overloading the roller
- Not sanding between coats
- Using the wrong nap roller for your surface
- Failing to maintain a wet edge
- Not cleaning the wall before painting
Avoiding these pitfalls will drastically improve the quality and lifespan of your paint job.
Conclusion
Drywall painting may seem like a simple task, but it requires the right preparation, tools, and techniques to achieve truly professional results. From priming and sanding to mastering the cut-in and rolling techniques, each step builds upon the last to create a smooth, durable, and attractive wall finish.
By applying these expert-level practices, you’ll not only improve the appearance of your walls but also ensure your paint job holds up over time. Whether you’re painting a single room or an entire house, these tips will help you achieve a finish that reflects care, skill, and attention to detail.
For homeowners seeking even greater assurance, working with trusted professionals like Wise Properties Painting & Pressure Washing can elevate the experience and guarantee long-lasting, high-quality results.
Frequently Asked Questions (FAQs)
Do I need to prime drywall before painting?
Yes, especially for new drywall or patched areas. Primer helps seal the surface and ensures the paint adheres properly and evenly.
What type of paint is best for drywall?
Acrylic latex paint is most commonly used for drywall. The finish (matte, eggshell, satin, etc.) depends on your desired look and level of durability.
How many coats of paint should I apply on drywall?
Two coats of paint are typically recommended. The first provides base coverage, and the second ensures a consistent color and finish.
Can I use a paint-and-primer-in-one product?
While these can work on previously painted surfaces, they’re not always sufficient for new or repaired drywall. A dedicated primer still offers better results.
How do I fix uneven paint or streaks?
Lightly sand the area, clean the dust, and repaint with proper technique. Using high-quality tools and maintaining a wet edge will reduce the chance of streaking.
- Drywall Painting Tips for a Smooth, Professional
- Discover expert-approved drywall painting tips to achieve a smooth, professional finish. Learn how to prep, prime, and paint like a pro with guidance from Wise Properties Painting & Pressure Washing.
- dray wall apinting
Related posts:
 How Much Do Gutter Services Cost in Bradford in 2025 | Complete Price Guide
 Top-Rated Swimming Pool Remodeling in Hoover AL You Can Trust
 Hosting a Big Event? Pre & Post-Party Cleaning Tips You’ll Thank Us For
 Safeguard Your Home: Professional Gutter Cleaning Fairfield Keeps Water Where It Belongs
 Gutter Cleaning Heathmont – Safeguard Your Home with Expert Gutter Maintenance
 Tips for Selecting the Best Kitchen Remodeling Services For Your Home
 How Cladding Can Improve the Thermal Efficiency of Bournemouth Homes


